Installation
These steps will quickly get JumpStart 5.10.n running and editable.
- Unzip. Unzip the downloaded file, which will give you a directory called jumpstart-5.10.n or similar.
- Move it to your development area, eg. /devel/jumpstart-5.10.n/ .
- DO NOT choose a directory whose path contains any spaces, eg. do not use a directory whose path includes C:/Documents and Settings/.
- Open it in Eclipse 3.6 ("Helios"), 3.7 ("Indigo"), or 4.2 ("Juno"). Open Eclipse, choose File > Import..., then choose General > Existing Projects into Workspace, click Next >, set the root directory to your jumpstart directory eg. /devel/jumpstart-5.10.n/, click Finish. The project can't build just yet so it will show errors.
- Ensure the project is using Java 1.6. In Eclipse, right-click on the project and choose Properties then Java Compiler and ensure Compiler compliance level is 1.6. You may have to turn on Enable project specific settings.
- Be wary of Sun-JDK version 1.6.0_18. It may upset OpenEJB (see OPENEJB-1131).
- Get dependent files The project has an Ant build file, build.xml, with a get-dependent-files
target. To run it in Eclipse:
- Open the Ant view and drag build.xml onto it.
- If your internet connection is through a proxy then
modify the setproxy tag in build.xml, eg.
-
<setproxy proxyhost="proxy.mycompany.com"
proxyport="8080"></setproxy>
- Run the get-dependent-files target
in the project's build.xml file (find the target in the Ant view and double-click on it).
If Ant has problems due to the maven repository
being slow or inaccessible, open the project's build.properties and choose a
different maven.repo.root, then try running the target again.
If it cannot get the kaptcha jar from nexus.sourcesense.com then modify web/build.xml to get http://savant.inversoft.org/com/google/code/kaptcha/kaptcha/2.3/kaptcha-2.3.jar instead, then run the target again.
	business/src/main/lib-compile/
	business/src/main/lib-provided/
	business/src/main/lib-runtime/
	business/src/test/lib-test/
	business/src/test/lib-test-hibernate/
	web/src/main/lib-compile/
	web/src/main/lib-provided/
	web/src/main/lib-runtime/
	web/src/test/lib-test/
- Refresh the project In Eclipse, right-click on the project and choose Refresh. This should build the project successfully and show no errors. It will also run collapser.xml, which will build the collapsed/ directory containing a WAR in "collapsed EAR" format. You can see how has this been configured by displaying the project's properties and choosing Builders.
- Set collapsed directory to derived In Eclipse, right-click on the collapsed directory, choose Properties, and tick the derived checkbox. Then click OK.
- Get Jetty WebServer. This will be your web server during development.
- Go to Codehaus Downloads and download jetty-6.1.26.zip (or, if you prefer, go to Jetty and navigate to the download).
- Once downloaded, unzip it. Move it to a suitable location (eg. /devel/jetty-6.1.26).
- In Eclipse, choose Window > Preferences > Java > Build Path > User Libraries (or in OS X, choose Eclipse > Preferences... > Java > Build Path > User Libraries), and
- Click New... and create a new user library called jetty-6.1.26-lib, then
- Click Add Jars... and add the following jars from Jetty's lib/ directory to the new user library:
	jetty-6.1.26.jar
	jetty-util-6.1.26.jar
	plus/jetty-plus-6.1.26.jar
	naming/jetty-naming-6.1.26.jar
- Get OpenEJB. This will be your embedded EJB container during development.
- Go to Apache Download Mirrors and download openejb-3.1.4.zip .
- Once downloaded, unzip it. Move it to a suitable location (eg. /devel/openejb-3.1.4).
- In Eclipse, choose Window > Preferences > Java > Build Path > User Libraries (or in OS X, choose Eclipse > Preferences... > Java > Build Path > User Libraries), and
- Click New... and create a new user library called openejb-3.1.4-lib, then
- Click Add Jars... and add every JAR in OpenEJB's lib/ directory to the new user library.
| Web Server | Business Server | Persistence | Database Server | Logger |
|---|---|---|---|---|
| Jetty | OpenEJB | Hibernate | HSQLDB | Log4j |
| (As a user library) | (As a user library) | (As jars in project) | (Within OpenEJB) | (As jars in project) |
Here's how to use it:
- Populate the database. Populate the Hypersonic database (HSQLDB) within OpenEJB:
- In Eclipse, open the data_util.properties file and modify the properties hsqldb.data.dir and hsqldb.jar.dir. Use relative paths eg. ../openejb-3.1.4/data/hsqldb and ../openejb-3.1.4/lib .
- Drag the data_util.xml file to the Ant view and run its target reset-database-hsqldb-prompted.
It will prompt you to confirm.
If you get the error "Cannot load 32-bit SWT libraries on 64-bit JVM" in OS X, then right-click on the target reset-database-hsqldb and choose Run As > Ant Build... > JRE and add VM argument-d32, and click Run. The cause is explained here.
- Start Jetty. In Eclipse...
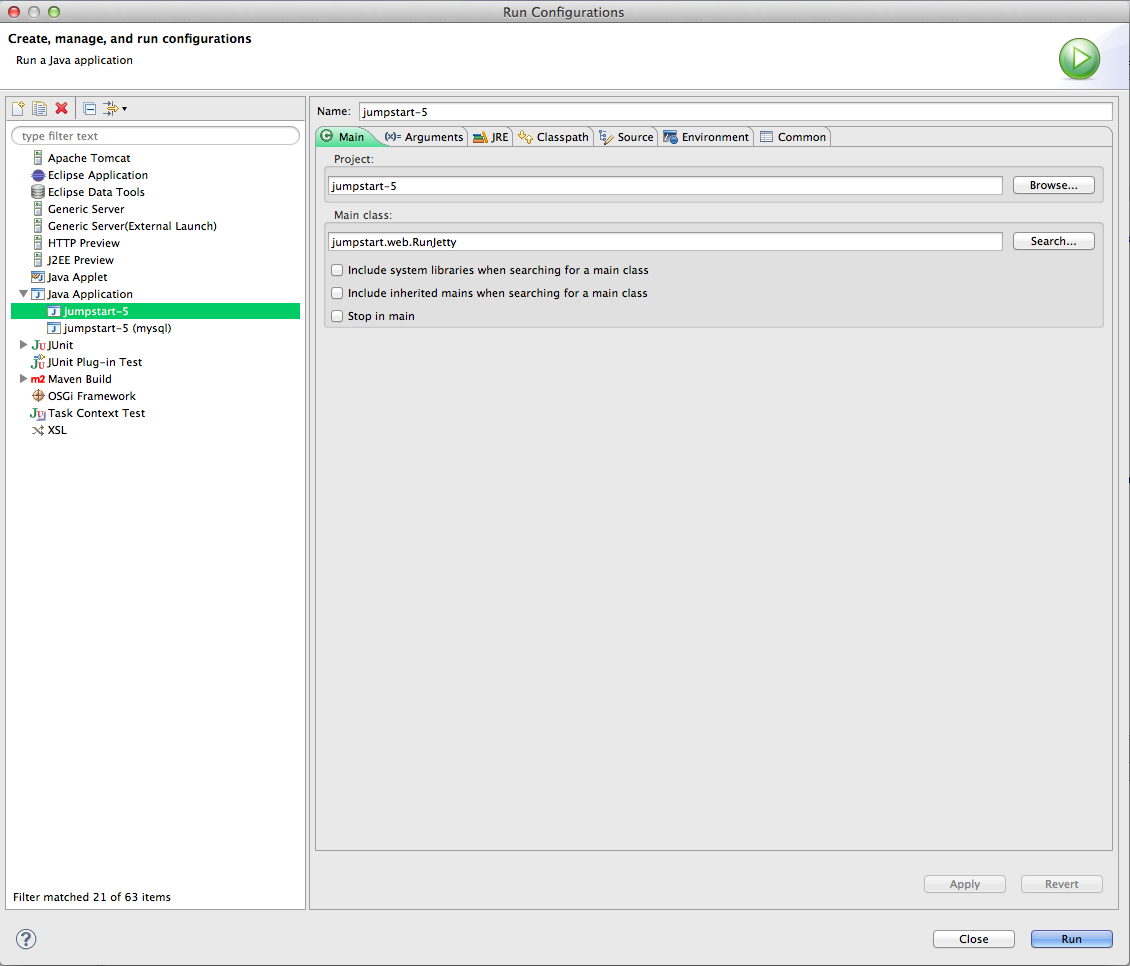
- Choose Run > Run Configurations.... The Run Configurations window will appear.
- Right-click on Java Application and choose New.
- Set the variables to values similar to those shown in the screen shot.
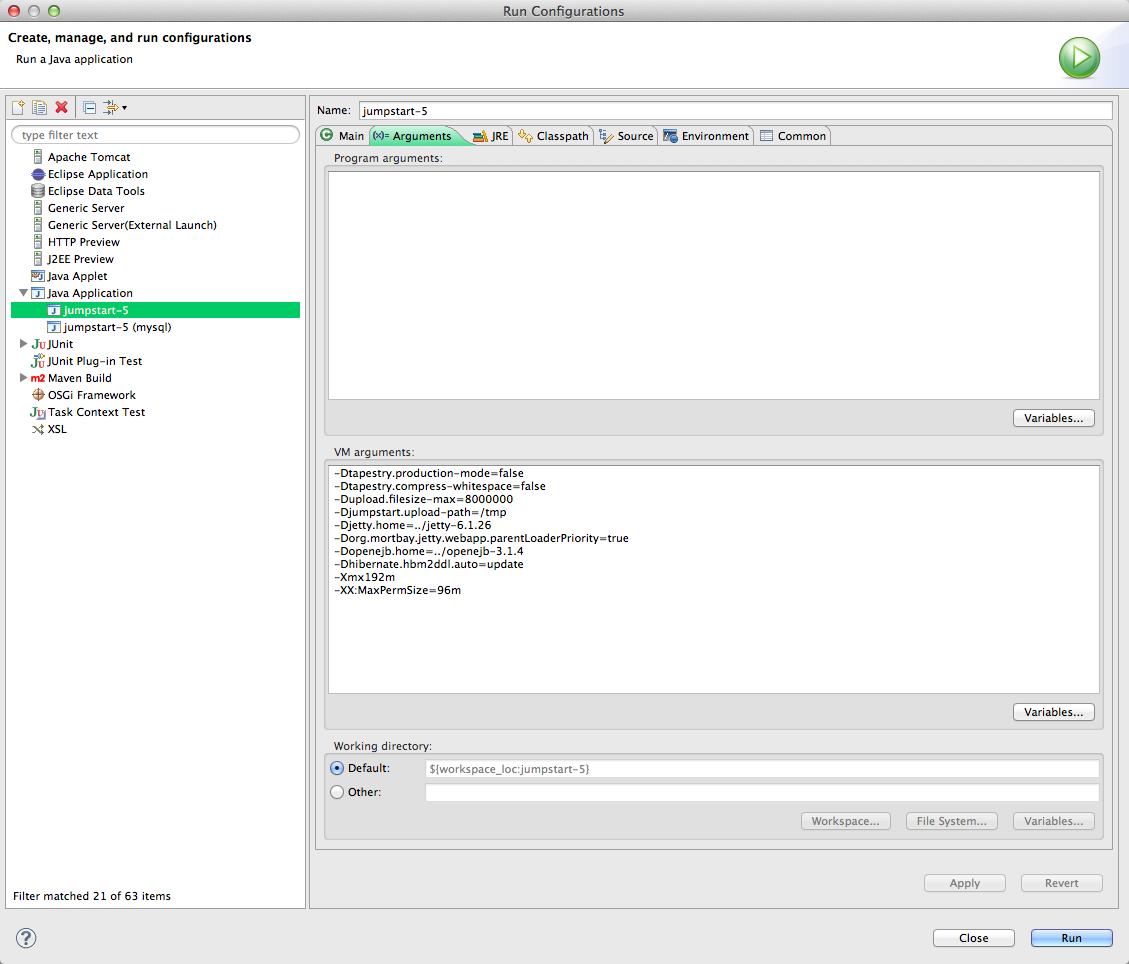
- Click on the Arguments tab.
- Set the VM arguments to the following, replacing the value of openejb.home with yours, eg.:
-Dtapestry.production-mode=false
-Dtapestry.compress-whitespace=false
-Dupload.filesize-max=8000000
-Djumpstart.upload-path=/tmp
-Djetty.home=../jetty-6.1.26
-Dorg.mortbay.jetty.webapp.parentLoaderPriority=true
-Dopenejb.home=../openejb-3.1.4
-Dhibernate.hbm2ddl.auto=update
-Xmx192m
-XX:MaxPermSize=96m - These arguments are explained here: tapestry, uploading files, jetty, openejb, hibernate, JVM. Choose an existing directory for jumpstart.upload-path.
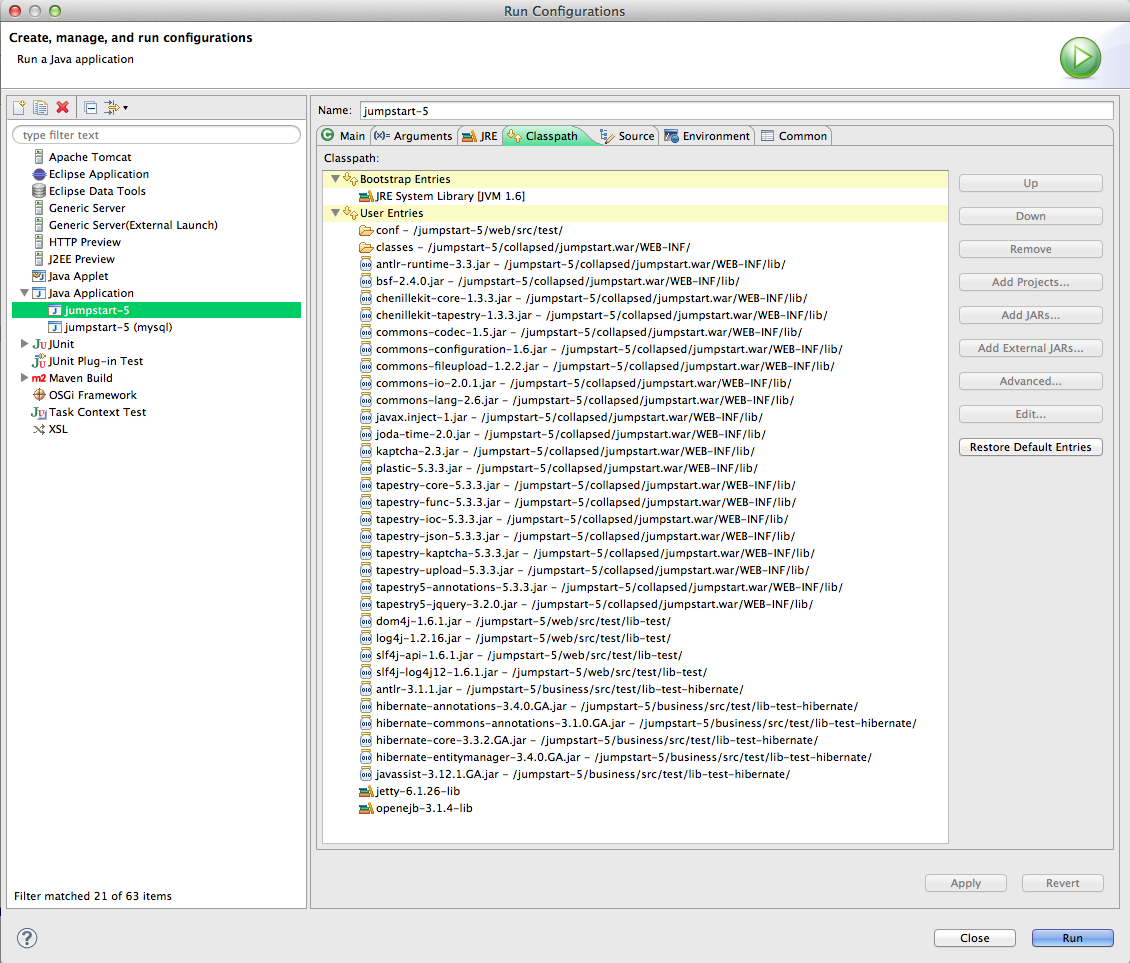
- We have to "spell out" the classpath to jetty to avoid classloader issues.
- Click on the Classpath tab.
- Remove the
(default classpath)entry. - Click on User Entries.
- Add these folders (Advanced... > Add Folders):
							web/src/test/conf

							collapsed/jumpstart.war/WEB-INF/classes/
- Add all JARs from these folders (Add JARs...):
							collapsed/jumpstart.war/WEB-INF/lib/

							web/src/test/lib-test/

							business/src/test/lib-test-hibernate/
- Add these user libraries (Advanced... > Add Library > User Library):
							jetty-6.1.26-lib

							openejb-3.1.4-lib
- Remove these JARs because they are also in the user library:
							jetty-6.1.26.jar - /jumpstart-n/web/src/main/lib-test/

							jetty-util-6.1.26.jar - /jumpstart-n/web/src/main/lib-test
- Move the two folders to the top. It avoids conflicts.
- Click Run.
- If error, especially
ClassNotFoundExceptionfororg.slf4j.Loggerororg.slf4j.impl.StaticLoggerBinder, check the Arguments and classpath match those shown above. - Check JumpStart is running by pointing your web browser at http://localhost:8080/jumpstart.
- Confirm you can log in by going to
http://localhost:8080/jumpstart/theapp/login
and logging in as secofr with password secofr.
There are another 2 users: admin and john, with passwords admin and john, respectively. - Try making a mod! As another quick test...
- In Eclipse, locate the template of the front page -
web/src/main/java/pages/Index.tml
- and modify it a little.
If you change the template or java of a page you'll see the change just a moment later in your running application.
- Remember - if the application isn't running then you can still immediately preview the mod by opening the .tml file with a web browser, or in Eclipse try Open With > Web Browser if that option is available. This is one of Tapestry's many strengths.
- In Eclipse, locate the template of the front page -
web/src/main/java/pages/Index.tml
- and modify it a little.
Visit Orientation, Debugging, Tips, and Troubleshooting for more info.