Installation
These steps will quickly get JumpStart 6.11.n running and editable.
- Unzip the download.
- Unzip the downloaded file, which will give you a directory called jumpstart-6.11.n or similar.
- Move it to your development area, eg. /devel/jumpstart-6.11.n/ .
- DO NOT choose a directory whose path contains any spaces, eg. do not use a directory whose path includes C:/Documents and Settings/.
- Open it in Eclipse.
- Eclipse 4.5 ("Mars"), 4.4 ("Luna"), 4.3 ("Kepler"), or 4.2 ("Juno") is preferred. The Eclipse IDE for Java EE Developers package is good (JumpStart is developed with it).
- In Eclipse, choose File > Import..., then choose General > Existing Projects into Workspace, click Next >, set the root directory to your jumpstart directory eg. /devel/jumpstart-6.11.n/, click Finish.
- The project can't build just yet so it will show errors.
- Ensure the project is using Java 7.
- In Eclipse, right-click on the project and choose Properties then Java Compiler and ensure Compiler compliance level is 1.7. You may have to turn on Enable project specific settings.
- Run get-dependent-files.
The project has an Ant build file, build.xml, with a get-dependent-files target. To run it in Eclipse:- Open the Ant view and drag build.xml onto it.
- If your internet connection is through a proxy then
modify the setproxy tag in build.xml, eg.
-
<setproxy proxyhost="proxy.mycompany.com"
proxyport="8080"></setproxy>
- Run the get-dependent-files target in the project's build.xml file (find the target in the Ant view and double-click on it). If Ant has problems due to the maven repository being slow or inaccessible, open the project's build.properties and choose a different maven.repo.root, then try running the target again.
- The new files won't be visible in the project just yet.
- Refresh the project.
- In Eclipse, right-click on the project and choose Refresh. This should build the project successfully and show no errors.
- It also runs collapser.xml, which builds the collapsed/ directory containing a WAR in "collapsed EAR" format. You can see how has this been configured by displaying the project's properties and choosing Builders.
- You can see now that the previous step, Run get-dependent-files, populated the following directories with JARS:
	business/src/main/lib-compile/
	business/src/main/lib-provided/
	business/src/main/lib-runtime/
	business/src/test/lib-test/
	business/src/test/lib-test-hibernate/
	tools/lib/
	web/src/main/lib-compile/
	web/src/main/lib-provided/
	web/src/main/lib-runtime/
	web/src/test/lib-test/
- Set the collapsed directory to derived.
- In Eclipse, right-click on the collapsed directory, choose Properties, and tick the derived checkbox. Then click OK.
- Get Jetty.
Jetty will be your web server during development.- Go to OpenLogic and download jetty-6.1.24.zip.
- Once downloaded, unzip it. Move it to a suitable location (eg. /devel/jetty-6.1.24).
- In Eclipse, choose Window > Preferences > Java > Build Path > User Libraries (or in OS X, choose Eclipse > Preferences... > Java > Build Path > User Libraries), and
- Click New... and create a new user library called jetty-6.1.24-lib, then
- Click Add External Jars... and add the following jars from Jetty's lib/ directory to the new user library:
	jetty-6.1.24.jar
	jetty-util-6.1.24.jar
	plus/jetty-plus-6.1.24.jar
	naming/jetty-naming-6.1.24.jar
- Get OpenEJB.
OpenEJB will be your embedded EJB container during development.- Go to Maven repo1 and download openejb-standalone-4.5.1.zip (or, if you prefer, go to Apache TomEE & OpenEJB and navigate to the download).
- Once downloaded, unzip it. Move it to a suitable location (eg. /devel/apache-openejb-4.5.1).
- In Eclipse, choose Window > Preferences > Java > Build Path > User Libraries (or in OS X, choose Eclipse > Preferences... > Java > Build Path > User Libraries), and
- Click New... and create a new user library called apache-openejb-4.5.1-lib, then
- Click Add External Jars... and add every JAR in OpenEJB's lib/ directory to the new user library.
- If your previous installation of JumpStart was 6.5.4...
In OpenEJB's lib/, see whether you have hsqldb-2.2.9.jar. If yes, then:- Delete OpenEJB's lib/hsqldb-2.2.9.jar and copy JumpStart's tools/lib/hsqldb-2.2.8.jar to OpenEJB's tools/lib/.
- In Eclipse, choose Window > Preferences > Java > Build Path > User Libraries (or in OS X, choose Eclipse > Preferences... > Java > Build Path > User Libraries), and
- Remove the old hsqldb-2.2.9.jar from your apache-openejb User Library and add the new hsqldb-2.2.8.jar.
- In OpenEJB's data/hsqldb/, open hsqldb.script for edit, delete the line SET DATABASE SQL REGULAR NAMES TRUE (probably line 6), save and exit.
| Web Server | Business Server | Persistence | Database Server | Logger |
|---|---|---|---|---|
| Jetty | OpenEJB | Hibernate | HSQLDB | Log4j |
| (As a user library) | (As a user library) | (As jars in project) | (Within OpenEJB) | (As jars in project) |
Here's how to use it:
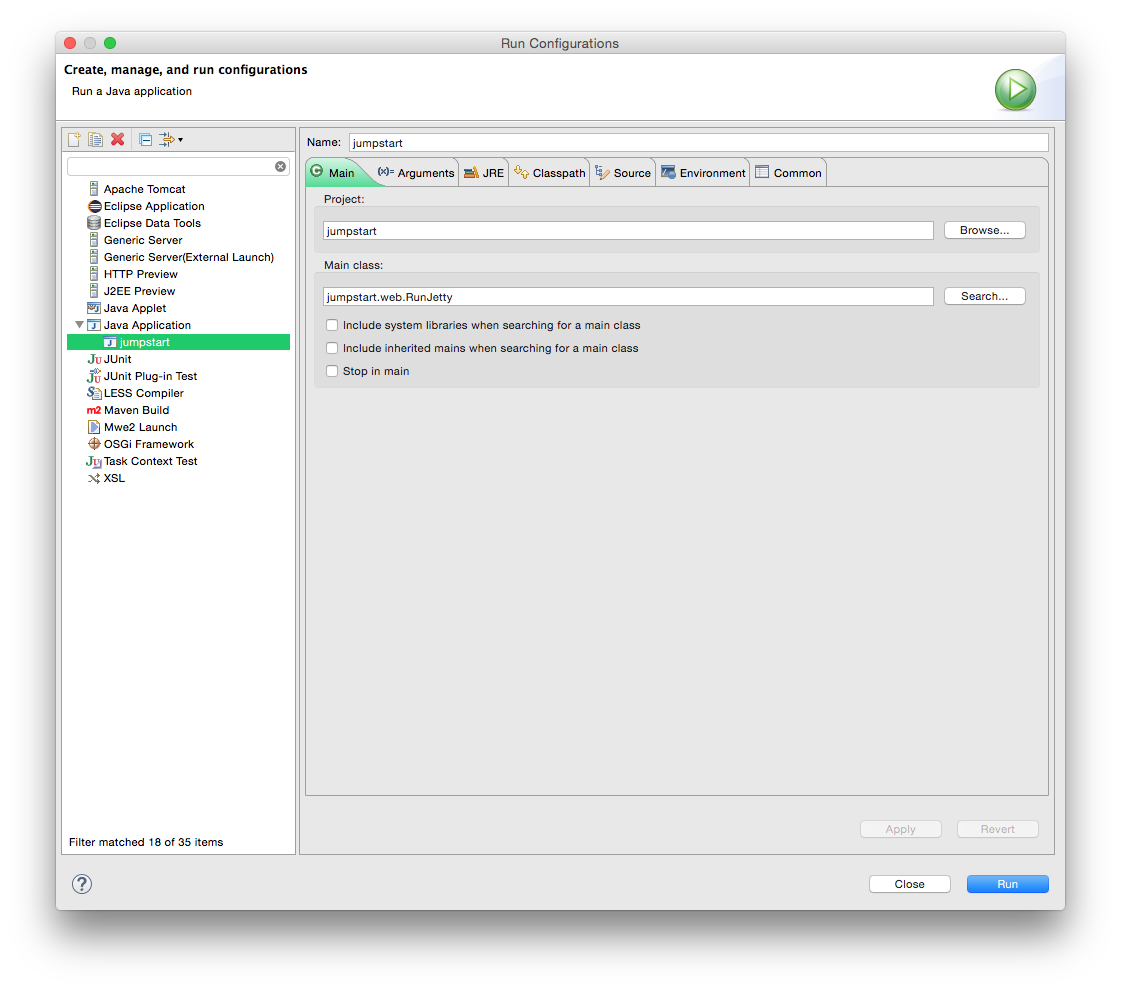
- Start JumpStart. In Eclipse...
- Choose Run > Run Configurations.... The Run Configurations window will appear.
- Right-click on Java Application and choose New.
- Set the variables to values similar to those shown in the screen shot.
- Click on the Arguments tab.
- Set the VM arguments to the following, replacing the value of jetty.home and openejb.home with yours, eg.:
-Dtapestry.production-mode=false
-Dtapestry.compress-whitespace=false
-Dupload.filesize-max=8000000
-Djumpstart.upload-path=/tmp
-Djetty.home=/devel/jetty-6.1.24
-Dorg.mortbay.jetty.webapp.parentLoaderPriority=true
-Dopenejb.home=/devel/apache-openejb-4.5.1
-Dhibernate.hbm2ddl.auto=update
-Xmx192m
-XX:MaxPermSize=96m - IN WINDOWS, we recommend setting jetty.home to a relative path and using forward slashes. We have seen Jetty startup errors in the log when a drive letter is used in the path, but Jetty might still run OK.
- The above arguments are explained here: tapestry, uploading files, jetty, openejb, hibernate, JVM. Choose an existing directory for jumpstart.upload-path.

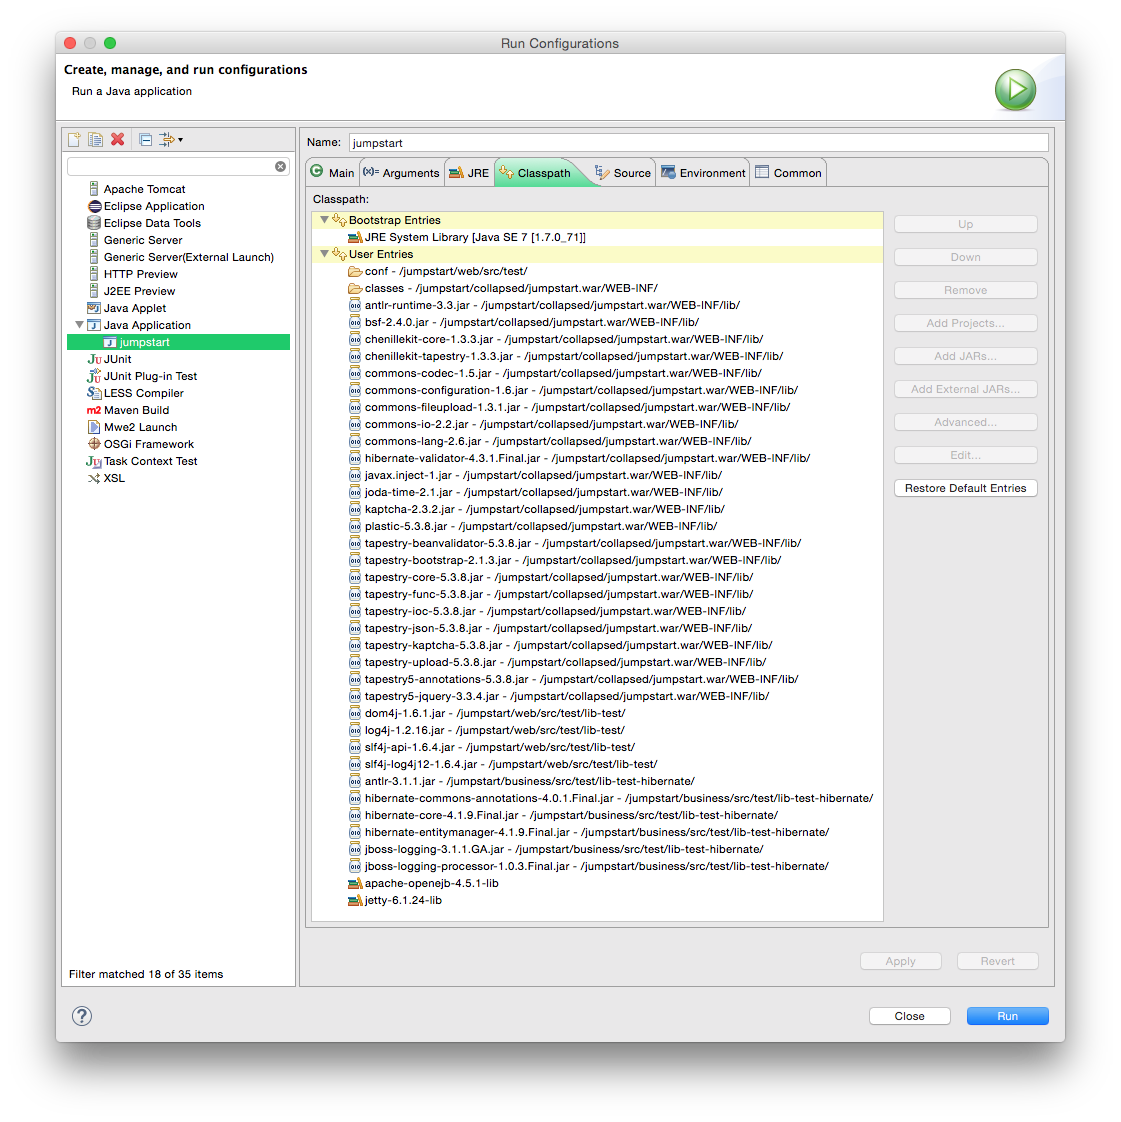
- We have to "spell out" the classpath to jetty to avoid classloader issues.
- Click on the Classpath tab.
- Remove the
(default classpath)entry. - Click on User Entries.
- Add these folders (Advanced... > Add Folders):
							web/src/test/conf

							collapsed/jumpstart.war/WEB-INF/classes/
- Add all JARs from these folders (Add JARs...):
							collapsed/jumpstart.war/WEB-INF/lib/

							web/src/test/lib-test/

							business/src/test/lib-test-hibernate/
- Add these user libraries (Advanced... > Add Library > User Library):
							apache-openejb-4.5.1-lib

							jetty-6.1.24-lib
- Remove these JARs because they are also in the user library:
							jetty-6.1.24.jar - /jumpstart/web/src/main/lib-test/

							jetty-util-6.1.24.jar - /jumpstart/web/src/main/lib-test
- Move the two folders to the top. It avoids conflicts.
- Click Run.
- If error, especially
ClassNotFoundExceptionfororg.slf4j.Loggerororg.slf4j.impl.StaticLoggerBinder, check the Arguments and classpath match those shown above. - Check JumpStart is running by pointing your web browser at http://localhost:8080/jumpstart.
- Populate the database. Populate the HyperSQL DataBase (HSQLDB) within OpenEJB:
- In Eclipse, terminate JumpStart (in the Console view click the red box).
- Open the data_util.properties file and modify the property database.url.
Use a relative path to your OpenEJB installation, eg. jdbc:hsqldb:file:/devel/apache-openejb-4.5.1/data/hsqldb/${database.name} . - Drag the data_util.xml file to the Ant view and run its target repopulate-database-prompted.
It will prompt you to confirm.
If you get the error "*** The HSQLDB files appear to be in use", and you are sure you terminated JumpStart, manually delete the hsqldb.lck file identified in the error message.
If you get the error "Cannot load 32-bit SWT libraries on 64-bit JVM" in OS X, then right-click on the same target and choose Run As > Ant Build... > JRE and add VM argument-d32, and click Run. The cause is explained here.
- Start JumpStart again.
- Check JumpStart is running by pointing your web browser at http://localhost:8080/jumpstart.
- Confirm you can log in by clicking on the Example App link and logging in as admin with password admin.
There are another 2 users: secofr and john, with passwords secofr and john, respectively. - Try making a mod! As another quick test...
- Return to the home page, http://localhost:8080/jumpstart.
- In Eclipse, locate the template of the home page -
web/src/main/java/jumpstart.web.pages.Index.tml
- and modify it a little.
If you change the template or java of a page you'll see the change just a moment later in your running application.
- Remember - if the application isn't running then you can still immediately preview the mod by opening the .tml file with a web browser, or in Eclipse try Open With > Web Browser if that option is available. This is one of Tapestry's many strengths.
Visit Orientation, Debugging, Tips, and Troubleshooting for more info.