USING JUMPSTART IN WILDFLY 11.0.0
WildFly is the free community version of JBoss Application Server. These notes apply to WildFly 11.0.0. They were tested with JumpStart 7.0.1.
ContentsPrepare WildFly
Build and deploy JumpStart
Build and deploy and integration test JumpStart
Use JumpStart
How to run integration tests from Eclipse
How to debug the client side
How to debug the server side
Prepare WildFly
These instructions prepare WildFly with the following elements:
| Web Server | Business Server | Persistence | Database Server | Logger |
|---|---|---|---|---|
| Undertow | WildFly's EJB3 | Hibernate | H2 | Log4j |
| (WildFly's default) | (WildFly's default) | (WildFly's default) | (WildFly's default) | (WildFly's default) |
- Start by doing a normal working WildFly 11.0.0 installation...
- To get it, go to WildFly Downloads, locate 11.0.0.Final and download the ZIP of Java EE7 Full & Web Distribution.
- Once downloaded, unzip the file. Move it to a suitable location, eg. /devel/wildfly-11.0.0.Final.
- Add a management user, eg.:
...in MacOS/Linux/Unix:- cd /devel/wildfly-11.0.0.Final/bin
- ./add-user.sh
- Answer the prompts to add a Management User in the ManagementRealm.
- cd /devel/wildfly-11.0.0.Final/bin
- add-user.bat
- Answer the prompts to add a Management User in the ManagementRealm.
- Start WildFly, eg.
...in MacOS/Linux/Unix:- cd /devel/wildfly-11.0.0.Final/bin
- ./standalone.sh
- cd /devel/wildfly-11.0.0.Final/bin
- standalone.bat
- Log in as the management user:
- Go to the WildFly welcome page, eg. http://localhost:8080/.
- Choose Administration Console and log in as the management user you added above.
- Add the data source JumpStartDS:
- In the Administration Console, choose Configuration > Subsystems > Non-XA > Add.
- In Create Datasource choose H2 Datasource > Next.
- In Step 1/3 choose:
- Name: JumpStartDS
- JNDI Name: java:/JumpStartDS
- In Step 2/3 choose Detected Driver > h2 > Next:
- In Step 3/3 choose:
- Connection URL: jdbc:h2:/devel/wildfly-11.0.0.Final/standalone/data/jumpstart (adjust this to suit your environment)
- Username: sa
- Password: sa
- Security Domain:
- Test Connection.
- ??? Make WildFly's H2 Database module available to all deployments:
- In the Administration Console, choose Profile > Container > EE
- Add new global module with:
- Name: com.h2database.h2
- Stop WildFly.
- Use Ctrl-c back on the command line where you started WildFly.
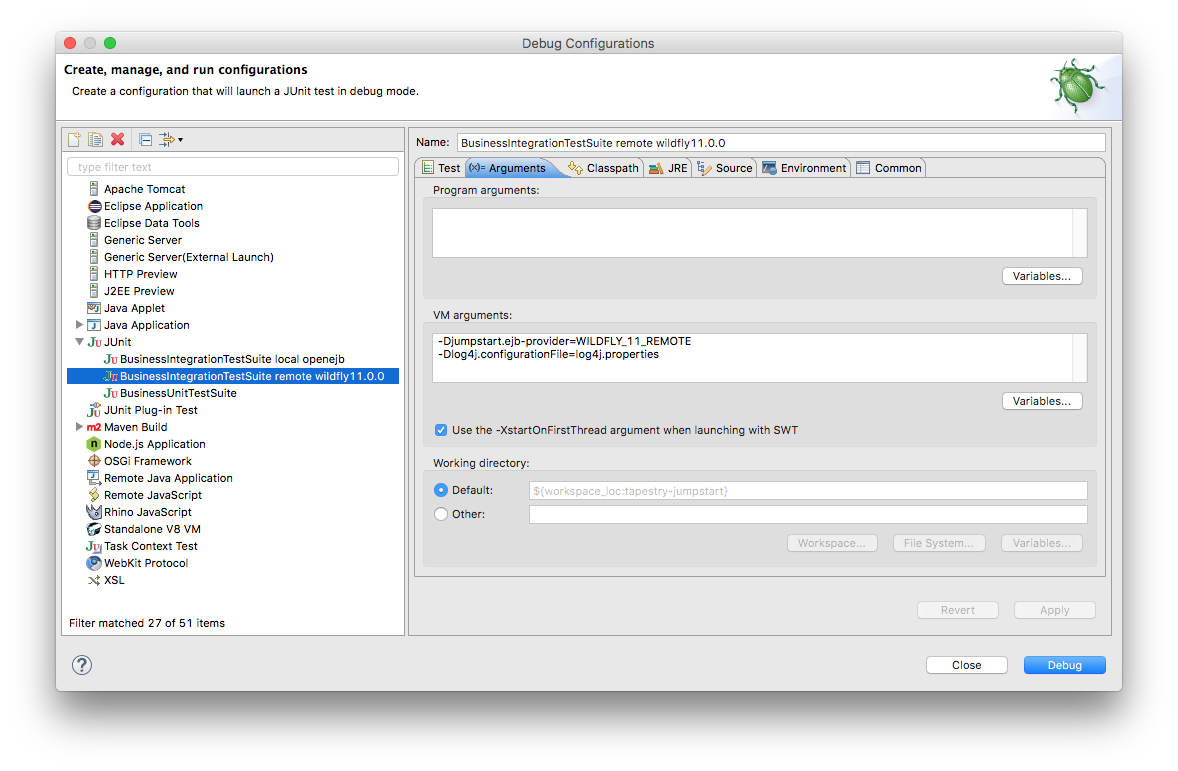
- Set VM arguments:
- Here are some VM arguments to consider. They are explained further here:
tapestry,
uploading files,
hibernate,
JVM technology
and JVM options.
-Dtapestry.production-mode=false Tells the Tapestry ExceptionReport page to display full details of the exception, which is great during development. When set to true (which is the default since T5.0.10), Tapestry's ExceptionReport page will display an abbreviated report so as to avoid disclosing details of your application's internals. -Dtapestry.compress-whitespace=false Tells Tapestry not to compress whitespace as it generates a page from a template. Makes the generated page source much easier to read eg. when you tell your browser to display the page source. -Dtapestry.application-version=xxxx RECOMMENDED FOR A PRODUCTION ENVIRONMENT. It is explained here. -Dtapestry.hmac-passphrase=xxxx ESSENTIAL FOR A PRODUCTION ENVIRONMENT. It is explained here. -Dupload.filesize-max=8000000 ESSENTIAL for JumpStart. Tells Apache Commons Upload to limit the size, in bytes, of upload files. -Djumpstart.upload-path=/tmp ESSENTIAL for JumpStart. Tells JumpStart where to save uploaded files. -Dhibernate.hbm2ddl.auto=update ESSENTIAL for JumpStart initially. Great during development, but
NOT RECOMMENDED IN A PRODUCTION ENVIRONMENT because data can be lost. Tells Hibernate to automatically bring the database structure into line with the app's entity definitions at every restart.
A better value for production isvalidate.-server Chooses the "server" JVM (which is optimised for speed). -Xmx512m Gives the JVM more heap memory (to avoid "out of memory" errors). 300m may be sufficient unless you do hot deploys. -XX:ReservedCodeCacheSize=24m Gives the JVM a smaller code cache than is the default (we don't need it). -Djava.net.preferIPv4Stack=true Might speed up WildFly startup on some Unixes (clustered AIX?) or other operating systems that have IPv6 enabled by default. - You can set them from the command line:
...eg. in bash (the default shell in MacOS Terminal since 10.3):- export JAVA_OPTS="-Djumpstart.ejb-provider=WILDFLY_11_LOCAL -Dtapestry.hmac-passphrase=qwerty -Dtapestry.production-mode=false -Dtapestry.compress-whitespace=false -Dupload.filesize-max=8000000 -Djumpstart.upload-path=/tmp -Dhibernate.hbm2ddl.auto=update -Duser.timezone=UTC -server -Xmx512m -XX:ReservedCodeCacheSize=24m -Djava.net.preferIPv4Stack=true"
- set JAVA_OPTS=-Djumpstart.ejb-provider=WILDFLY_11_LOCAL -Dtapestry.hmac-passphrase=qwerty -Dtapestry.production-mode=false -Dtapestry.compress-whitespace=false -Dupload.filesize-max=8000000 -Djumpstart.upload-path=/tmp -Dhibernate.hbm2ddl.auto=update -Duser.timezone=UTC -server -Xmx512m -XX:ReservedCodeCacheSize=24m
- Or you can modify WildFly's domain.xml, host.xml or standalone.xml:
- See System Properties in General Configuration Concepts.
- Here are some VM arguments to consider. They are explained further here:
tapestry,
uploading files,
hibernate,
JVM technology
and JVM options.
- Start WildFly, eg.
...in MacOS/Linux/Unix:- cd /devel/wildfly-11.0.0.Final/bin
- ./standalone.sh
- cd /devel/wildfly-11.0.0.Final/bin
- standalone.bat
- When you start WildFly you might wish to enable remote access to the web site from other computers:
- Remote access is turned off by default. WildFly does this by binding all its services to localhost (127.0.0.1). A quick way to enable remote access is to bind WildFly to all available network interfaces (0.0.0.0).
- To enable remote access, when you start WildFly you specify -Djboss.bind.address=0.0.0.0 as a parameter, eg.
standalone.bat -Djboss.bind.address=0.0.0.0
./standalone.sh -Djboss.bind.address=0.0.0.0
You cannot specify this in JAVA_OPTS - it won't work. See Command Line Parameters.
- Enhance Tapestry's classpath resolver: in the JumpStart project's web/src/main/java/jumpstart/web/services/AppModule.java file, ensure the ClasspathURLConverterWildFly11 line is active (ie. not commented out), like this:
configuration.add(ClasspathURLConverter.class, new ClasspathURLConverterWildFly11());
- Set the build properties: in the JumpStart project's build.properties file, edit the value of these properties:
- deployment.server.type
- deployment.persistence.descriptor
- deployment.server.dir
- Review wildfly-hibernate-h2-persistence.xml.
- Hibernate 4 has new strategies for generating entity IDs. By default Hibernate disables them but WildFly enables them!
You can disable them again by adding the following to business/src/main/resources/persistence-descriptor/wildfly-hibernate-h2-persistence.xml:
<property name="hibernate.id.new_generator_mappings" value="false"/>
For more information see https://community.jboss.org/thread/170623 .
- Hibernate 4 has new strategies for generating entity IDs. By default Hibernate disables them but WildFly enables them!
Build and deploy JumpStart
Here we use Ant to clean, compile, unit test, package, deploy to the server, and wait for it to load.
The deployed package is jumpstart.ear.
- In Eclipse, drag build.xml to the Ant view and run its target clean-compile-test-package-deploytoserver-checkactive.
- If you get an error about JAVA_HOME, read this. Use a JDK 7 tools.jar.
Build and deploy and integration test JumpStart
Here we use Ant to clean, compile, unit test, package, deploy to the server, wait for it to load, and run the business integration test suite.
The deployed package is jumpstart.ear. The tests remotely call the JumpStart business layer services exposed by the server.
- In Eclipse, drag build.xml to the Ant view and run its target clean-compile-test-package-deploytoserver-integrationtest.
- If you get an error about JAVA_HOME, read this. Use a JDK 7 tools.jar.
Use JumpStart
Ensure the command line is using Java 8: the commands java -version and javac -version must return a variant of 1.8, eg. 1.8.0_101.
If WildFly is running, stop it (Ctrl-C).
Before you use JumpStart for the first time in a new server, you need to build it, deploy it, and run the integration tests.
Populate the H2 Database within WildFly with data. H2 provides a handy console to edit the database:
- Find the h2-*.jar in your WildFly server's modules/system/layers/base/com/h2database/h2/main/ directory.
- The h2-*.jar is an executable jar file. Double click on it. It will start an application, org.h2.tools.Console, which will then open a web page with the H2 web console.
- Set the JDBC URL, using the full path to your data file, eg. jdbc:h2:/devel/wildfly-11.0.0.Final/standalone/data/jumpstart.
- Set the User Name and Password to the values you chose above when setting up data source JumpStartDS.
- Click Test Connection. If that fails, correct the settings and try again.
- You will be prompted to enter an SQL statement.
- Replace the data in the database by copying and pasting in the SQL statements found in business/src/test/data/initial_data.sql, and clicking Run (Ctrl + Enter).
- Click the Disconnect icon. This releases its lock on the database file.
How to run integration tests from Eclipse
First, build and deploy JumpStart as described above.
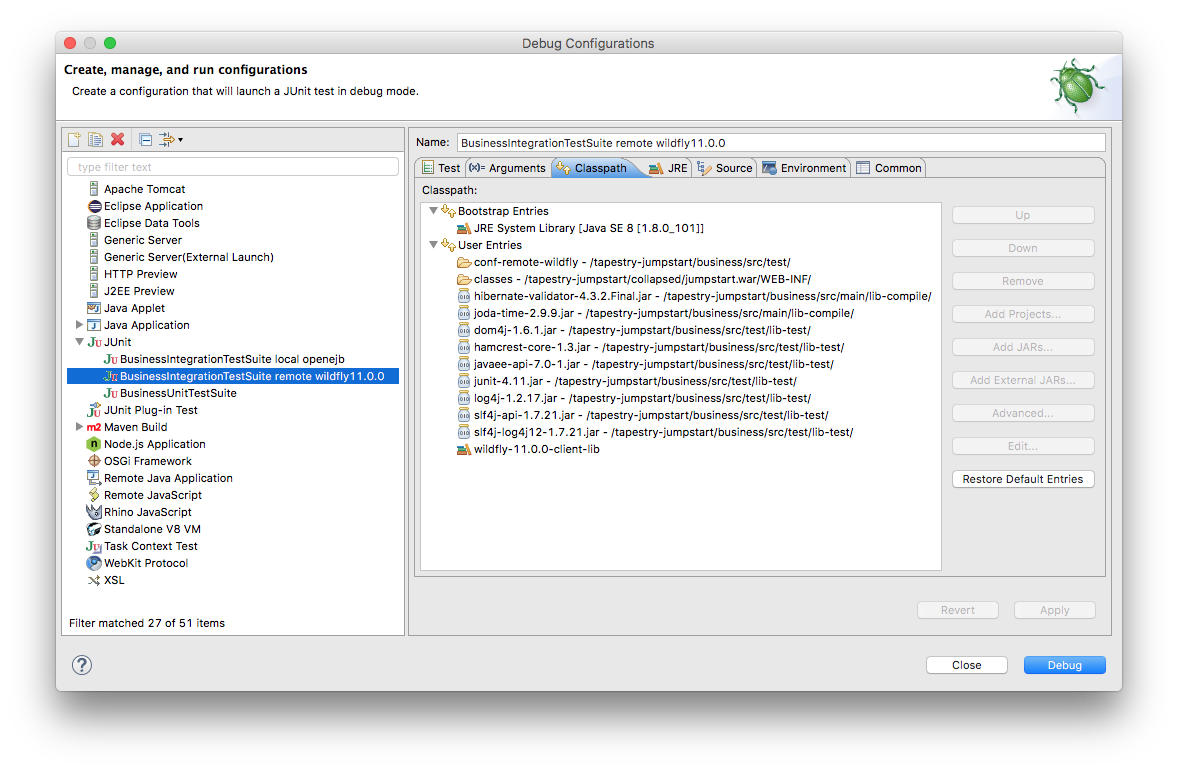
Second, create a User Library over WildFly:
- In Eclipse, choose Window > Preferences > Java > Build Path > User Libraries (or in OS X, choose Eclipse > Preferences... > Java > Build Path > User Libraries), and
- Create a new user library called wildfly-11.0.0-client-lib, then
- Add these WildFly server jars to the new user library:
- bin/client/jboss-client.jar
- modules/system/layers/base/org/hibernate/main/hibernate-core-4.*.jar
- modules/system/layers/base/org/hibernate/main/hibernate-entitymanager-4.*.jar
- modules/system/layers/base/org/hibernate/main/hibernate-java8-4.*.jar
- modules/system/layers/base/org/javassist/main/javassist-3.*.jar
- modules/system/layers/base/org/jboss/logging/main/jboss-logging-3.*.jar
- modules/system/layers/base/com/h2database/h2/main/h2-*.jar
|
|
|
|
|
|
- Click Run.
- Watch the results in the JUnit View panel. In the Console View you might see lots of exceptions but that's normal. The JUnit View will tell you quickly whether the tests succeeded or not.
- Problems? Eclipse might not be ready for junit - see Could not create task or type of type: junit.
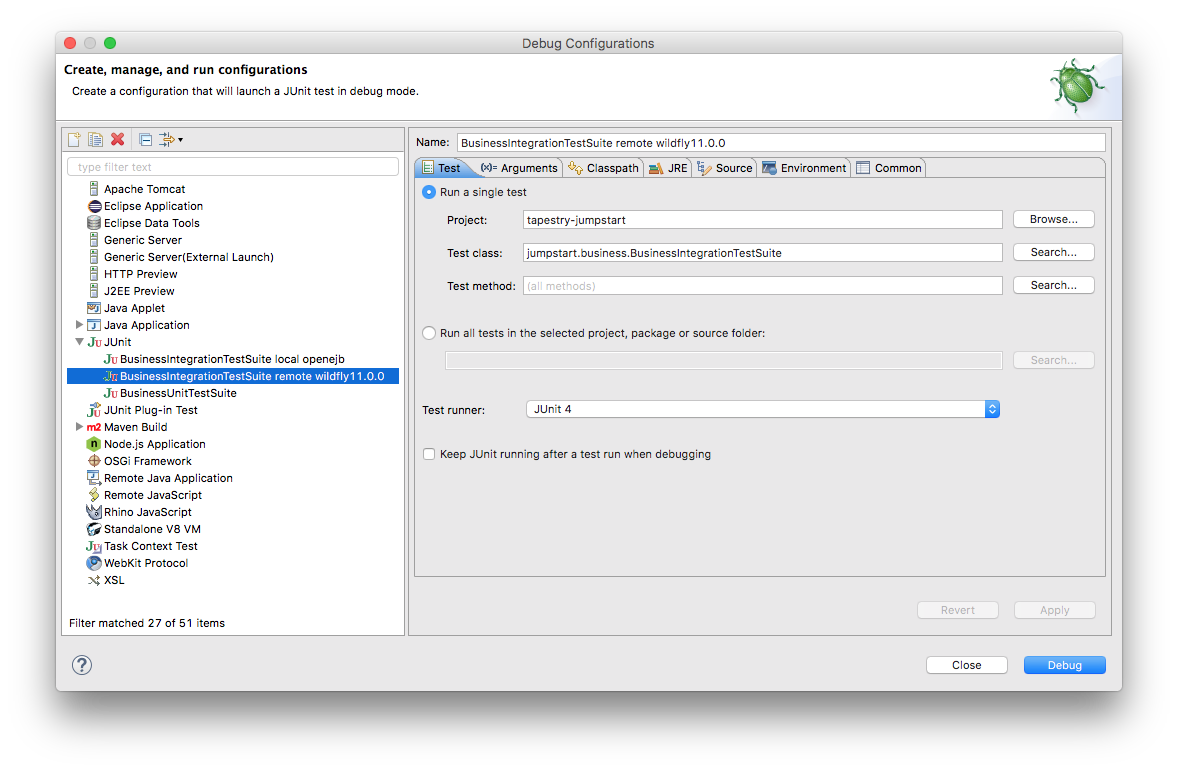
How to debug the client side
To debug, for example, the client side of the integration tests, use Run > Debug Configurations... instead of Run > Run Configurations....
Eclipse will then stop at breakpoints, display variables, enable single-stepping, etc. in the test suite.
How to debug the server side
To debug any part of JumpStart as it runs in the server you'll need to be running WildFly in debug mode. There are a couple of ways to do it:
- Start WildFly in debug mode.
...in MacOS/Linux/Unix:- cd /devel/wildfly-11.0.0.Final/bin
- ./standalone.sh --debug
- cd /devel/wildfly-11.0.0.Final/bin
- standalone.bat --debug
- Right-click on Remote Java Application and choose New.
- Set the Port to 8787.
- Enable Allow termination of remote VM.
- Click on Debug.
- Control WildFly server from Eclipse WARNING This section has not been tested since JBoss 6.1.
In Eclipse's Server view, add your WildFly server.
You can set the JVM options, as described above, by right-clicking on the server entry and choosing Open > Open launch configuration > Arguments.
You can start the server by right-clicking on the server entry and choosing Start or Debug.
By default the port used by WildFly for debug is 8787. Restart WildFly and you will see this message in the log...
-
Listening for transport dt_socket at address: 8787
In Eclipse, right-click on your project and choose Debug As > Debug Configurations... and the Debug Configurations window will appear.
WildFly resumes startup, and Eclipse will now stop at breakpoints, display variables, do single-stepping, etc. on any Java in the project.